
Visible Red Light Photography Experiment
Experiment Kickoff: November 14, 1998
Status: Ongoing
The Visible Red Light Experiment consists simply of standard 35mm black and white photography, using red #25 lens and gel flash filters to enhance the contrast of images captured on film. In experiments conducted by renowned paranormal investigators during the 1970s, anomalous images appearing as white streaks in the air were captured on many photographs. These images were not visible to the photographer or to bystanders when the photographs were taken.
This page is broken down into the following sections:
Facts About Visible Red Light Photography - Facts and myths about methods of photography employing red lens and flash filters.
Visible Red Light Photography Experiment Results - Up to date results from our use of visible red light photography through the course of our investigations.
Examples of Visible Red Light Photography - Examples of visible red light photography. No anomalous images.
Key Points When Working With Visible Red Light Photography - Details on the equipment and setup used, and the best methods for shooting.
Facts About Visible Red Light Photography
What exactly does visible red light photography reveal? According to many paranormal investigators, placing a red gel pack over your camera's flash will yield photos that take advantage of the infrared spectrum of light in some way. This is absolutely NOT TRUE - remember that you heard it here first. Using a red gel pack will not "push the photo into infrared" or anything that sounds remotely like this. A photo taken with black and white film using a red gel over the flash is simply an image formed from red light on a black and white negative. Here's why:
First of all, the infrared content of light emitted by a camera flash is virtually unaffected by the use of a transparent red filter. Standard camera flash units emit many types of light from the optical spectrum (see figure 1). This spectrum consists of infrared light above 700 nanometers, ultraviolet light below 400 nanometers, and visible light, which falls directly between the infrared and ultraviolet spectrums. As the name implies, visible light is the only type of light that can be seen with the naked eye.
Figure 1 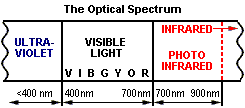
As can be seen in figure 2, placing a red #25 gel filter over the flash will cause all light under 600 nanometers to be filtered out, allowing only light that is over 600 nanometers through. This is caused by the filters absorption of all light below 600 nanometers. Because the flash inherently emits light at and above 600 nanometers including infrared light above 700 nanometers, there is virtually no difference in these emissions, regardless of whether a red filter is used or not. As you can see, the red filter does nothing to "create" infrared light or "push" the light into the infrared spectrum...this infrared light was already present.
Figure 2 
Even more important to understanding why using a red gel over the flash has nothing to do with creating infrared images on standard black and white film is the fact that standard panchromatic black and white film is not sensitive to infrared light. It simply does not register any light from the infrared spectrum. This is an inherent limitation of the film, and using lens or flash filters will have no effect on this. For example, let's examine the two most popular types of black and white film: Kodak T-Max TMY 400 ASA, which is developed using the typical black and white process, and Kodak C400TN 400 ASA, which can be developed using the same C-41 process used with most color film. The T-Max 400 stock is variably sensitive to light between approximately 410 nanometers and 650 nanometers, after which sensitivity drops off sharply by 675 nanometers to almost nothing.The spectral sensitivity of T400CN is similar to the T-Max, ranging approximately from 400 nanometers to 640 nanometers, dropping of sharply to zero at 650 nanometers. Interestingly, the spectral sensitivity of Kodak Gold Max 400 actually ends closer to the infrared spectrum than either the T-Max or the T400 CN stock, yet at 675 nanometers it still falls far short of the infrared spectrum. As you can see from figure 2 above, all three of these ranges fall within the visible spectrum of light, defined as the area between 400 nanometers and 700 nanometers.
Again, by using a red lens filter to remove light emitted by the flash that is below 600 nanometers, and by accounting for the inherent limitation of the film's sensitivity to below 650 nanometers, we can see that the net effect of this combination is an image formed on the negative of light ranging from 600 to approximately 650 nanometers, clearly well below the infrared spectrum. Simply put, this is an image formed from red light on a black and white negative. The only practical benefit to the image is that of greater contrast.
Visible Red Light Photography Experiment Results
We have used the Visible Red Light Experiment on the following occasions during the course of our investigations:
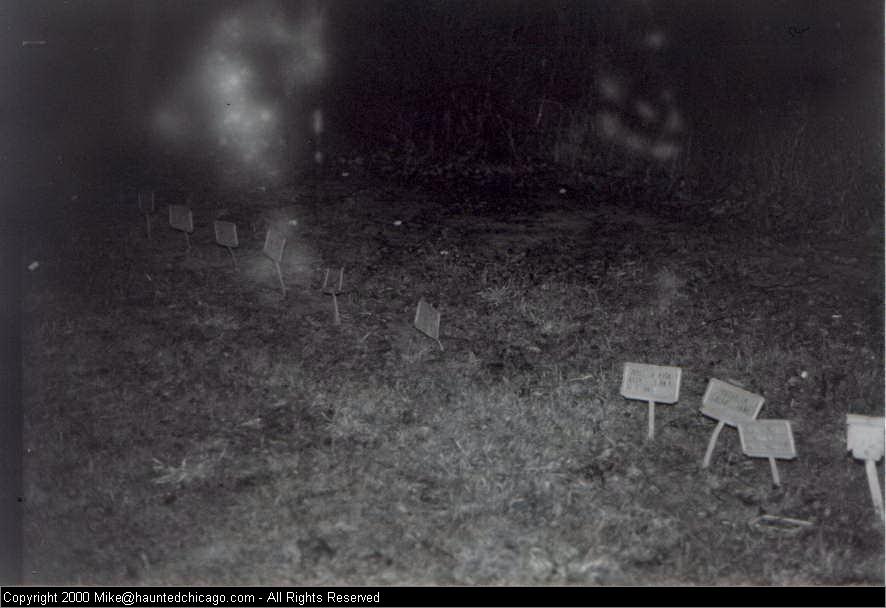
February 6, 1999 - Mount Thabor Cemetery - The following anomalous results were obtained.
This photograph was the only one with results from our first investigation utilizing the Visible Red Light Photography experiment. Notice the white haze near the upper left corner of the picture, as well as the strange formation of hazy dots further to the right. Several other photos were taken at this exact same location within 2-3 minutes before and after this one, yet nothing at all appeared on those. It is most apparent on the original print that the formation on the left is at a distance from the camera, at least 5-8 feet. As the photographer, I can vouch for the use of careful breathing techniques during the experiment to avoid condensation in front of the camera. Previously, Lisa had obtained excellent results from this exact same location at Mt. Thabor Cemetery, using standard photography. In future investigations, we will be concentrating on this particular area within the cemetery to conduct other experiments.
Examples of Visible Red Light Photography
No other examples available yet.
Key Points When Working With Visible Red Light Photography
In the course of our ongoing Visible Red Light Photography Experiment, we use the following items:
35 MM SLR camera (aperture adjustment required - point and shoot cameras will not work well)
High power external flash
400 ASA Kodak B/W film (Kodak T-Max TMY 400 ASA, Kodak T400CN 400 ASA C-41 process)
Red #25 flash gel pack (several layers of red cellophane has worked)
Red #25 lens filter
In setting the camera and flash up and preparing to shoot, keep in mind that the red flash gel pack will cause a great deal of visible light to be filtered out. You will need to compensate by opening the aperture up at least 3-4 stops, possibly more depending on the distance from the subject. As always, be sure to shoot towards a subject, rather than straight out into a field - shooting at nothing will most likely result in under-exposed images. At 10 feet, you will probably need to be at f 5.6. In general, I was surprised by the forgiving nature of this technique in low-light situations. After seeing the intensity of the flash, I thought for sure that the entire roll would be under-exposed. Yet every frame between f 1.7 and f 5.6 turned out fine.


© 1998-2002 Hauntedchicago.com - All rights reserved
Attention: All material on this website is copyrighted by the respective owner. Unauthorized use of any material or information from this website, including but not limited to images and written information, is expressly forbidden without prior written permission of the copyright owner. Use this site at your own risk. We present our findings for the sole purpose of our viewers' enjoyment and do not encourage or endorse illegal or dangerous activity. Do not trespass on private property or where posted. You are responsible for your own actions, we can not be responsible for the actions of visitors to our website. By using our website, you agree to be bound by our acceptable use policy. If you do not agree with our policy, you may not use our site. For questions or concerns, please contact the webmaster.